Browse › Tech ›Electrical and chassis

How To Solder

Started by 200sxkitcar · Jun 3, 2008 · 19postsSMF 2010–26

200sxkitcarJun 3, 2008, 6:01 pm · #1

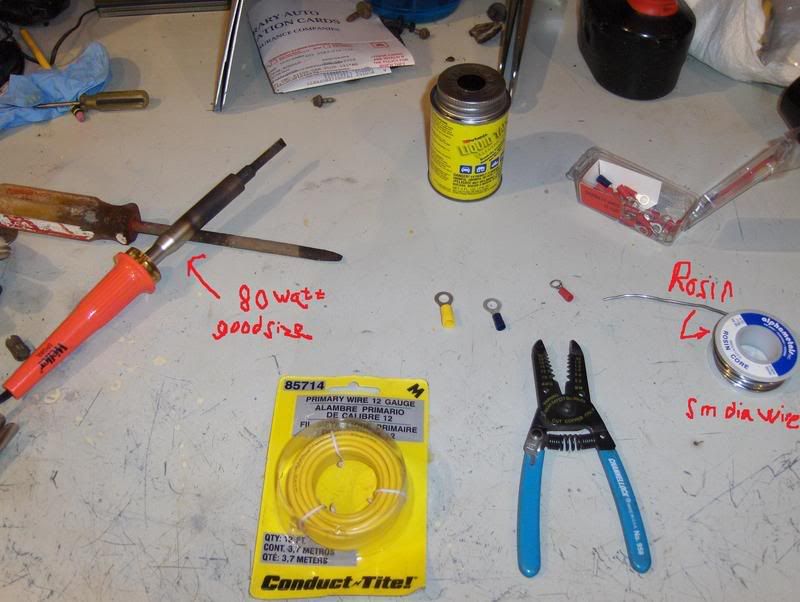
So you need:
 
rosin core solder, NOT acid core.  usually it will say on the package for electrical use, and its generally of a smaller diameter than the solder used for plumbing apps.

soldering gun- 80watts is good, anything higher is just faster, but some have duty cycles (limits to how long they can be on before needing to cool down) the pencil types are nice, as opposed to the gun types

wire stippers, the ones in the pic are better, the ones with the crimp features are OK but tend to be of lesser quality.  When they are closed, look to see how tight the gaps are, and try and move around the actual cutting parts to see if they have play/will bend.

electrical tape or liquid electrical tape, heat shrink tubing is nice as well

ends, wire, etc
posted image

The colors of the eyes and butt connectors reference the size of wire that goes with that connector, look at the packages at the store and match them to your wire size.

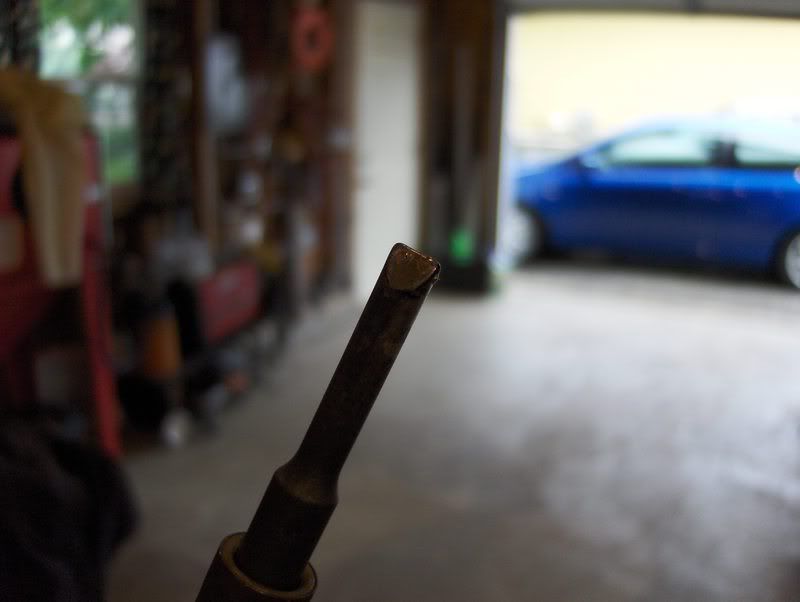
Its good to have/leave some solder on the end of the torch,
posted image

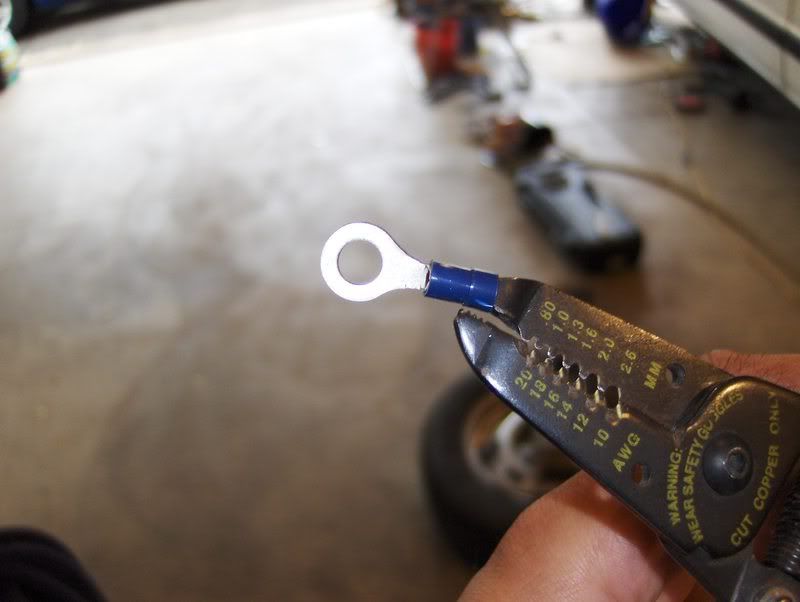
I remove the plastic shit off the ends, it tends to come off anyhow, and you'll need it off if you solder this joint.  A twisting action on the eye while pulling is the key,
posted image

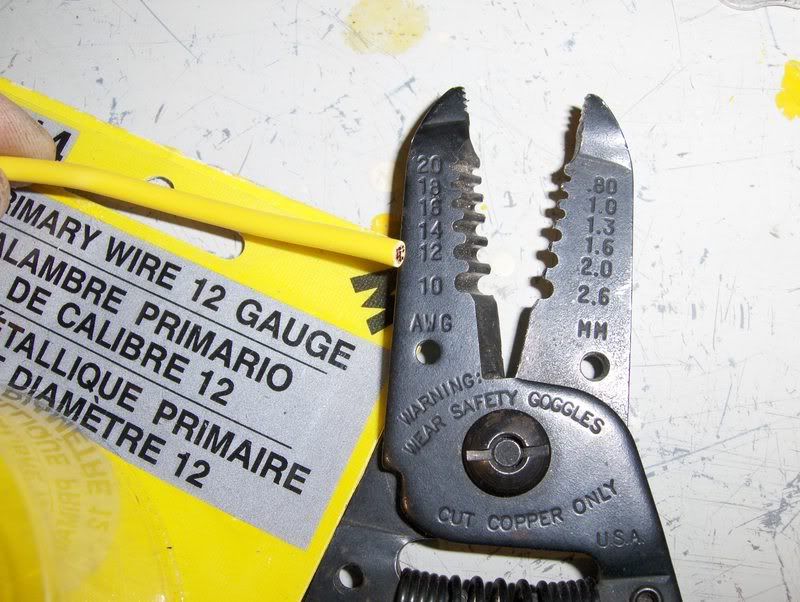
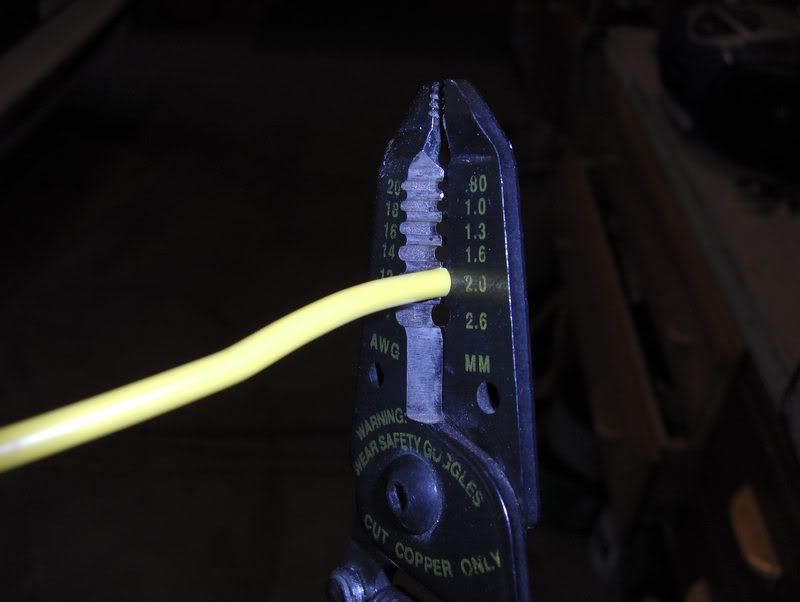
Matching the wire gauge to the correct hole size on the strippers,
posted image

posted image

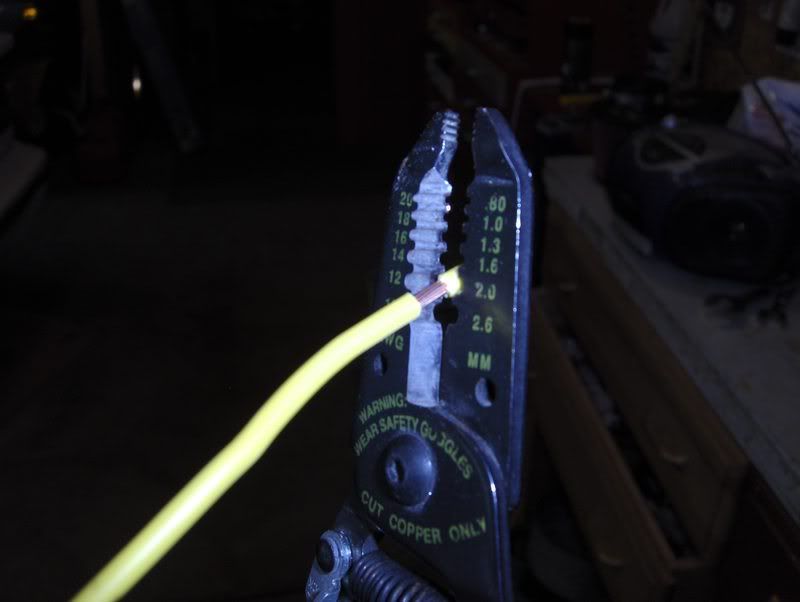
Squeeze through the insulation, but when you go to pull it off, I pull farther back on the insulation, as to not drag the cutters along the copper, which tends to remove some of the strands with the insulation.
posted image

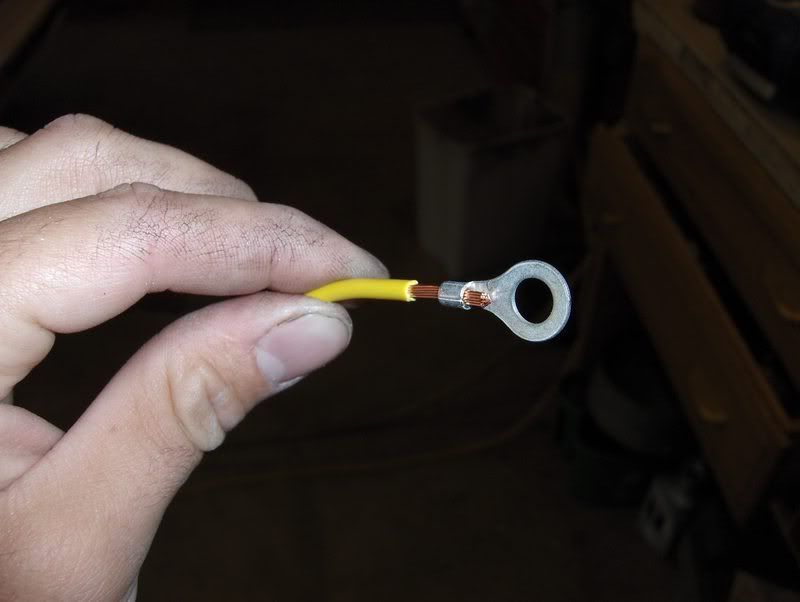
Notice a nice snug fit, but probably a bit too snug to get the metal wings to clamp on it real good.  People will have differing opinions on this, but this terminal was probably at the max of its wire gauge range here,
posted image

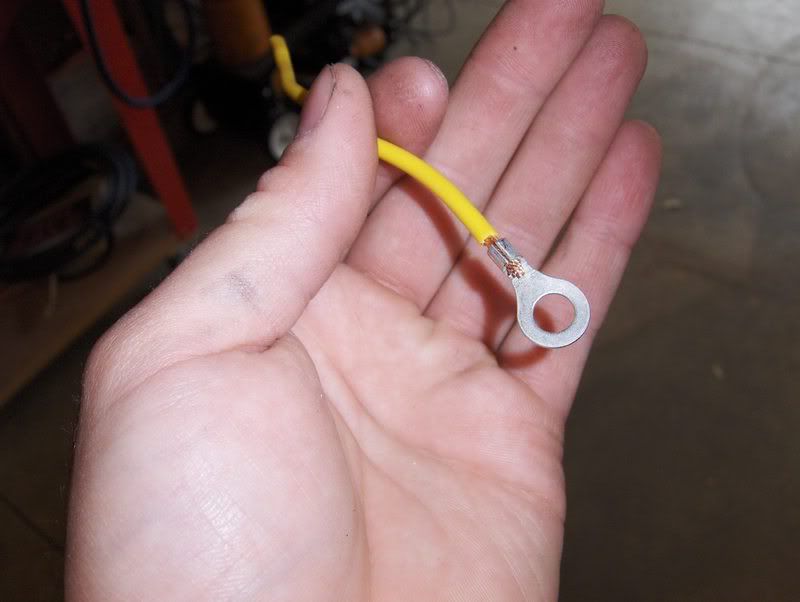
Twisting the strands, then inserting them into the connector, notice how I stripped too much, so I cut some of the excess copper strands off,
posted image

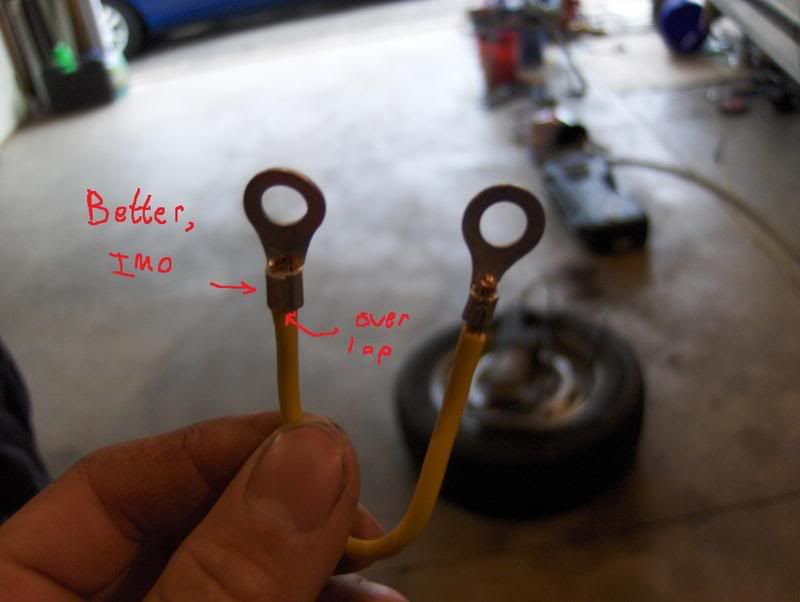
I went up to the next sized connector (the yellow ended one) for the other end, similar prep, and then clamped them both down.  Notice the overlap, I think that is stronger, imo..
posted image

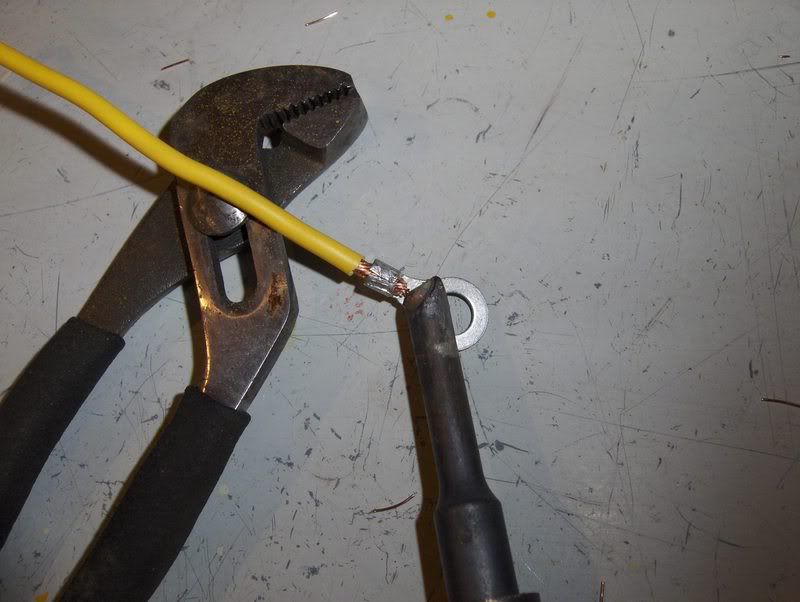
Heating the ends of the strands, not the connector, let them heat soak,
posted image

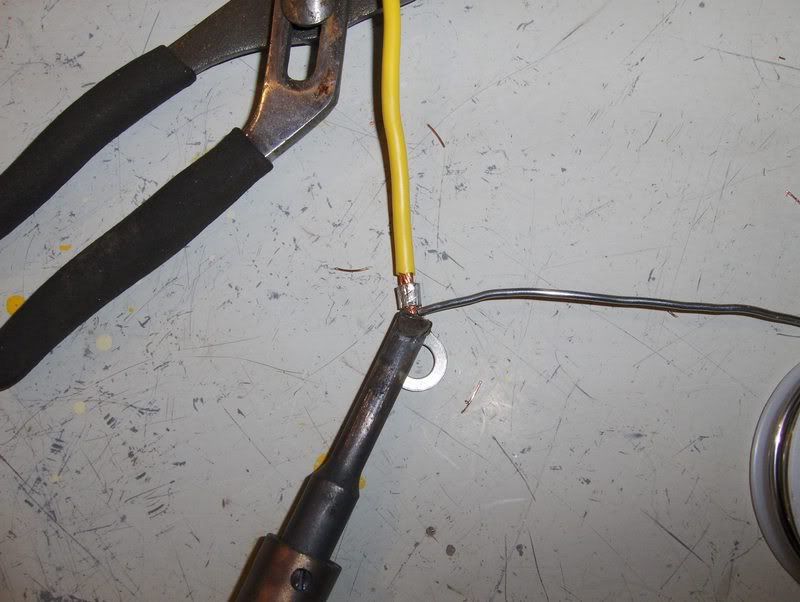
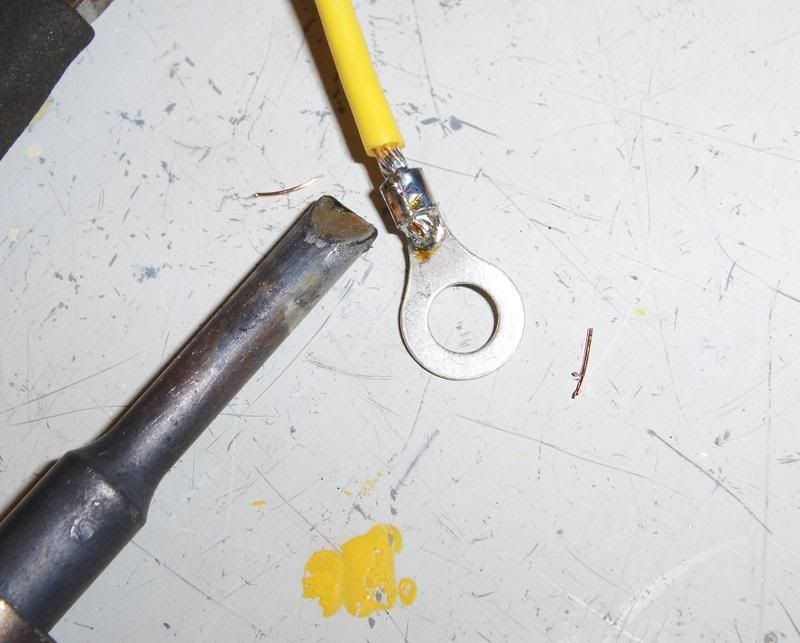
Then dabble on the solder, start with getting some on the gun and feeding it to the wire.  Once its going on the wire, don't add any more to the gun, but walk it back as the wire heat soaks, letting it melt in through the folded-over metal wings of the connector, and then to the back by the insulation,
posted image

posted image

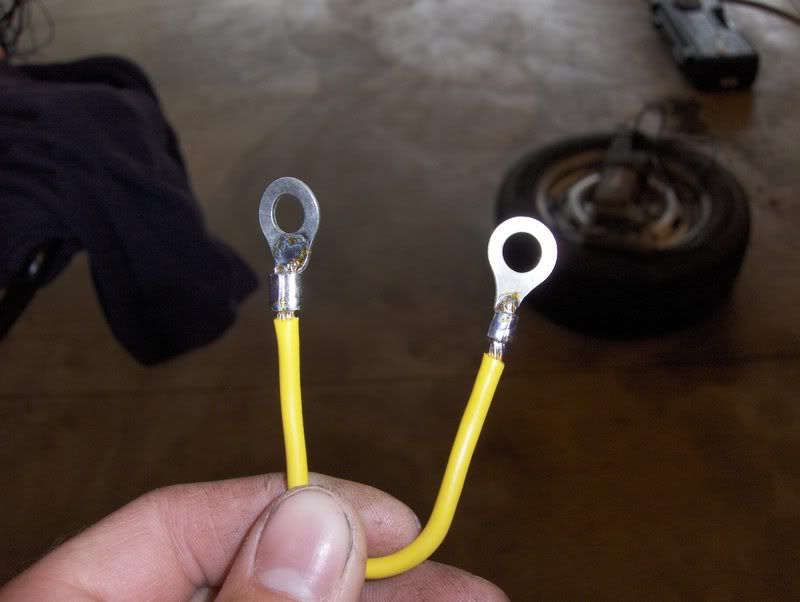
The other end with larger connector,

posted image

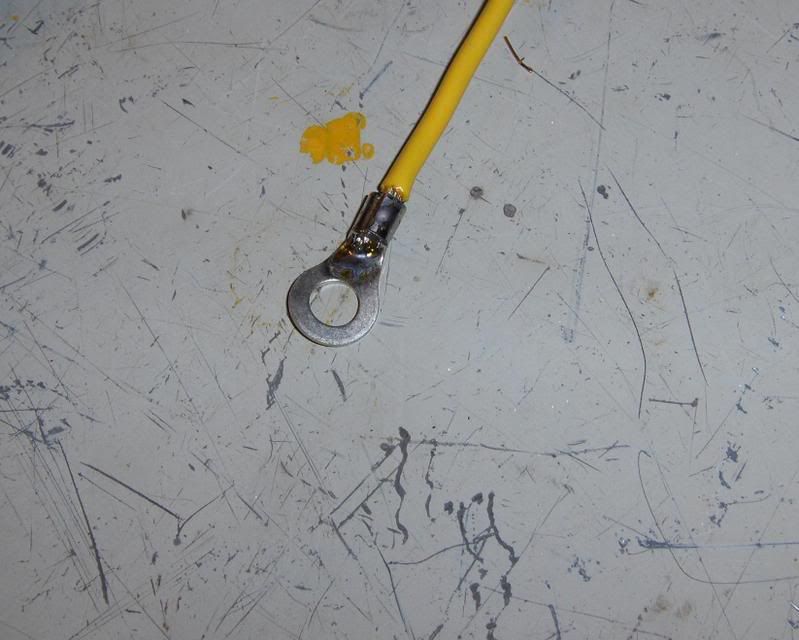
Note I kept the solder mostly off of the eye where the screw or bolt will stick through, as thats not really necessary,
posted image

----------------------

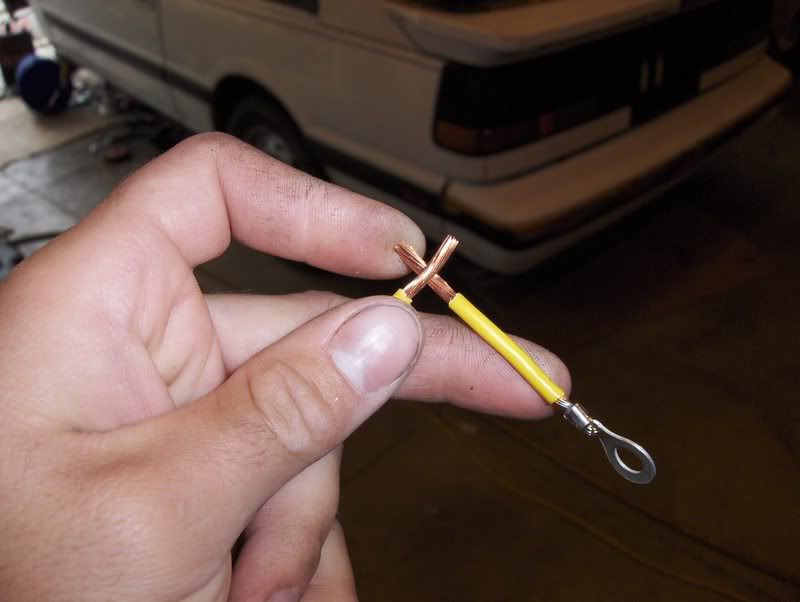
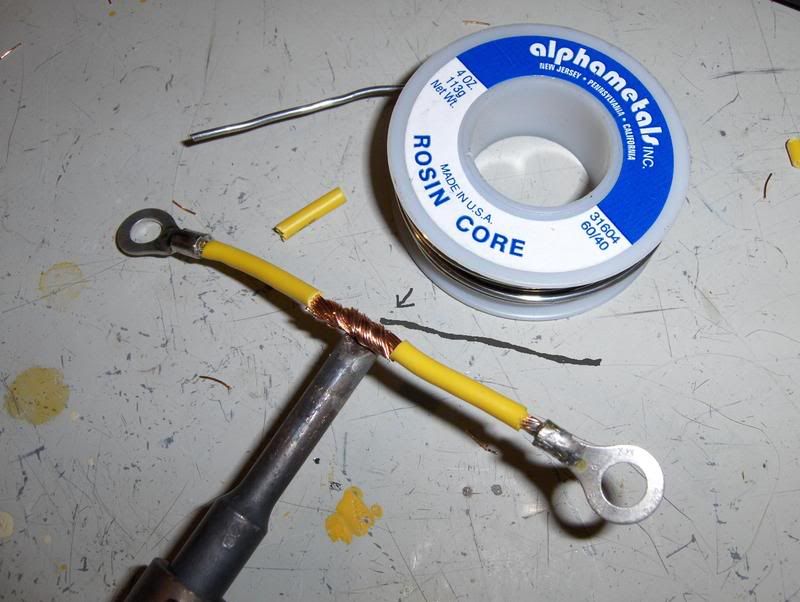
Now to do a direct wire splice, which is preferable to using connectors as there is greater strength and less resistance, start by stripping the wires back.  Note here, this is thicker wire, so I ended up stripping more back.  Normally about 5/8 to 1/2 is good enough.  Cross them about in the center,
posted image

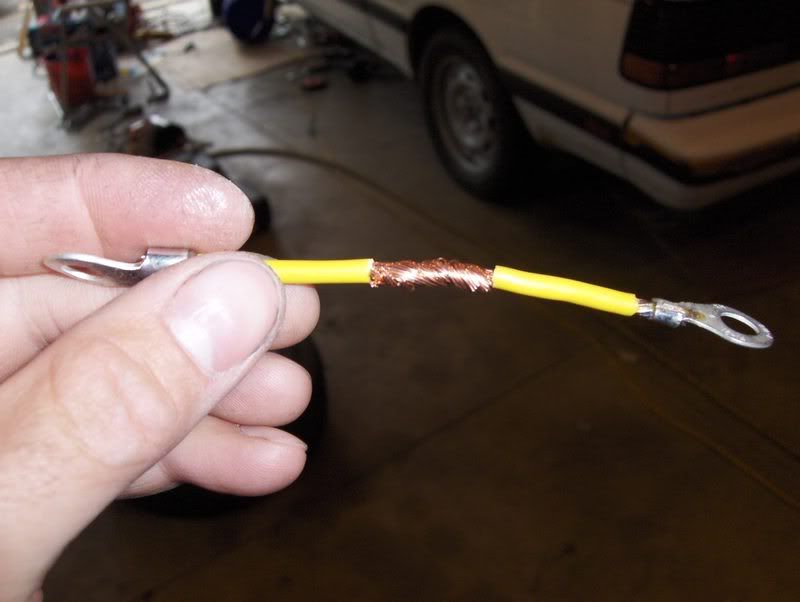
And fold them around each other at the same time, evenly.  I don't have three hands, so this is what your end result should be.  Notice how the ends of the wire pretty much wrap up and stop just as the insulation begins, and both stop at about the same place at the joint, if everything is cherry,
posted image

Resting the soldering gun tip with the angled part on the joint, not just the end butted up to it, for better heat transfer, I let it heat up for awhile, then begin to feed some solder into the area between the torch tip (the hottest part) and the wire joint.  I get a bit on the tip of the torch and kinda walk it down to the wire, but then I just add it to the wire from then on.  If it doesn't flow well at this point, it needs more heat.  Don't add too much solder to the tip of the torch, as it won't heat transfer well then.  If too much solder gets on it, remove it and a quick flick of the wrist and the solder will come flying off onto the ground, your bench, your friend, whatever.
posted image

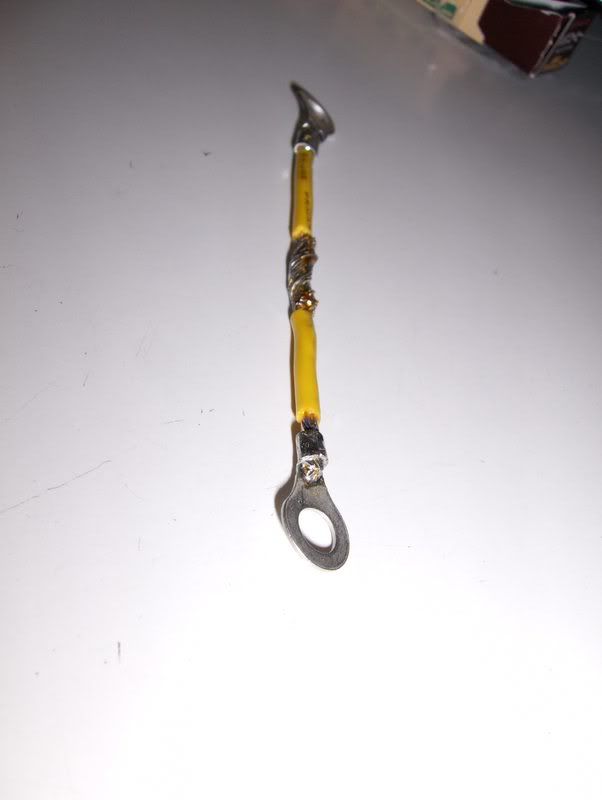
Feed the solder to the points of the ends of the insulation, don't go overboard but cover up the copper nicely, walking the solder around on the wire so it spreads evenly.  The heat will do most of the work, as well as the flux thats built into the solder.  Finished product,
posted image

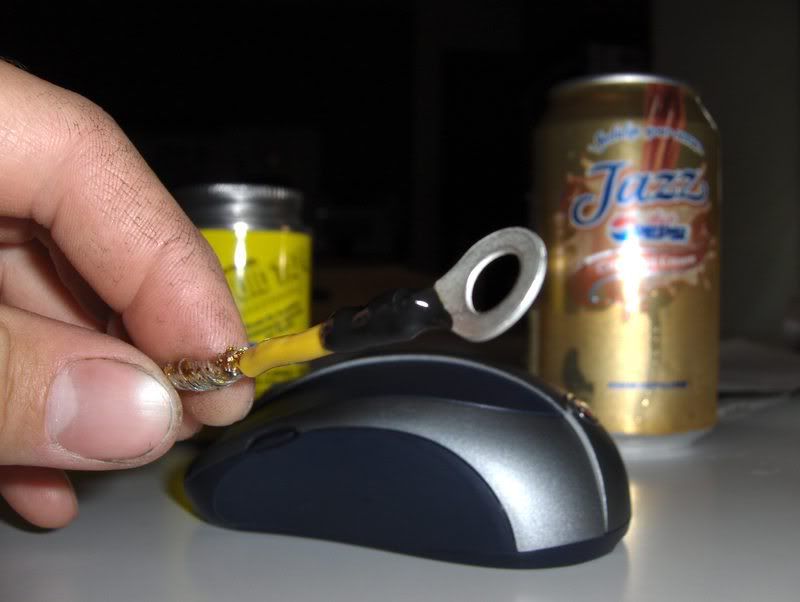
After it cools, then I tend to put on liquid electrical tape, usually two thin coats will do it well, and then if its a spliced joint, regular electrical tape over it.  Reason being, sometimes if you have a sharp point of wire, the liquid tape will not cover it well, so a single layer of regular tape ensures sealing.
posted image

People also use heat shrink, which is great, but if your wires are short, the stuff tends to shrink up on the wire because of the soldering heat before you can slide it over the finished product, then heat it up.  Thats a matter of preference, as long as its protected well, then you're good.

KLOXJun 3, 2008, 6:12 pm · #2

good man... solder is king.. i hate crimp caps!

200sxkitcarJun 3, 2008, 6:15 pm · #3

I've had so many crip-only type connections pull out on me, and one of these soldered type has yet to fail.  Plus, it seals the wire and connector from the elements and getting corroded.

200sxkitcarJun 3, 2008, 6:30 pm · #4

The 80watt soldering gun works so much better, as the 20watt one never seems to get hot enough.  It would be great for electronics and things, but the higher powered one works much better for automotive applications, and I think it cost me around 30ish.

http://www.farmandfleet.com/catalog/produc...amp;h=050201004

Weller part number SPG80L

David BJun 3, 2008, 6:33 pm · #5

yea mine is actually a 15-30, it has a switch.

but i still think its junk, but hey! at least it kinda works? better then crimping regardles....

but yea, i wanna look into a butane one anyways.
my moms ex fiance had one and it was mad beast

Jsvob03Jun 3, 2008, 7:30 pm · #6

nice.

FYI, when soldering, you always want the finished joint to be shiny. if it is a dull finish, it is considered to be "cold" and will not last/work well.

also, for those who don't/can't solder, there are crimp n seal connections. they are SWEET, they seal out moisture, and lock everything in place. I still prefer soldering.

BTW, I was trained, and practiced for YEARS (about 4) when it comes to soldering. everything from wire splices, to Surface mount, i can do it. (sorry, i gotta brag while i can.)

JulieJun 3, 2008, 9:36 pm · #7

Pepsi Jazz. drink of soldering champions

i learned how to solder after getting into the r/c hobby. i often have to solder battery connectors to the battery packs and occasionally re-wire speed controllers.

i got alot of soldering ahead of me when it comes time to do the wiring for my DET swap. ill end up buying a better iron though, as right now i use a Weller 20w w/ the 1/4" tips. its plenty for my hobby needs, but not enough for the job i have planned for it. the same iron was used when i installed door speakers in a acura tl, so it might be enough.. who knows. that job is too far away to worry abotu right now

RB25sx - SLPRJun 3, 2008, 10:12 pm · #8

As for your splicing technique I have 2 suggestsions, and these are very much just suggestions.

I've had it happen several times where once having been heatshrunk a strand or two of sharp wire core or bit of pointed solder residue burrows it's way through the heatshrink. To counter this I used a buttconnector, however I first skinned the plastic casing away until I was left with just the metal sleeve. Then I pre-tinned the wires and soldered them to each other inside the sleeve, and then applied the heatshrink..

Also, do you ever fan the wires out prior to merging and twisting them? I find they have alot higher dry coherence that way, and almost feel like they dont even need solder to maintain the connection.

Great write up!

-Dan

200sxkitcarJun 3, 2008, 10:35 pm · #9

Um, yea thats a great idea about those butt connectors!  That would definitely work in the same fashion.  I personally don't rarely use the heat shrink, rather I put liquid electrical tape on in a sufficient amount and then wrap it once over with regular electrical tape.  Hell its overkill, but thats how I am when it comes to electrical stuff.  It all gets tucked away in loom anyhow, if its a bit larger in diameter than normal I don't often care.

You could fan them out, I've not done that, the example was in 12 gauge with thick strands, but I will have to try it.  They probably would integrate better, definitely something to try.  If I do I'll add some info and a pic to this.

Thanks for your input!

juliePepsi Jazz. drink of soldering champions

i learned how to solder after getting into the r/c hobby. i often have to solder battery connectors to the battery packs and occasionally re-wire speed controllers.

i got alot of soldering ahead of me when it comes time to do the wiring for my DET swap. ill end up buying a better iron though, as right now i use a Weller 20w w/ the 1/4" tips. its plenty for my hobby needs, but not enough for the job i have planned for it. the same iron was used when i installed door speakers in a acura tl, so it might be enough.. who knows. that job is too far away to worry abotu right now

lol@ jazz.  it was free leftover from a friends wedding

Most of the wires that are part of the adaptation are actually rather small, and you could do it with the 20watt, but it will take a bit longer to heat up, thats all.  There is only one larger wire that feeds the S13 stuff, and its about the size of the 12 gauge I did there, and thats doable with 20 watts.  If you do it when its cold, like winterish, you may have some issues, I had a hard time soldering with mine when it gets cold like we experience at this latitude.  Once I tried to fix the ex's taillight wiring when it was like 10 degrees out, and with the wind, my 200watt unit would barely do it, and that was thin gauge wire too.  fuck the cold!
XanoJun 4, 2008, 2:13 pm · #10

I'm not sure if these have been covered, but these are things I've learned/noticed.

Tip one: NEVER USE ACID CORE WIRE.  The acid core will actually eat away at your soldering tip and cause it to not heat properly much quicker than the rosin core will.

Tip two: Make sure to not OVER-heat the joint prior to adding solder, as it will start to melt the wire's sheathing if it gets too hot.

Tip three: Try to buy a few different type soldering tips to use in the tool, there are different shapes/materials, and you'll want to find out what you like the best shape wise.

rageJun 4, 2008, 3:21 pm · #11

also, using flux helps out ALOT if youre having problems with solder not sticking to the connection. buying a tip cleaner and cleaning it regularly helps out aswell.

KLOXJun 4, 2008, 9:16 pm · #12

when i was a car audio installer at circuit city... everyone had really expensive soldering guns... that they paid like $30.00 plus for... i went to a place called harbor freight and got one for 8 bucks!!! still works to this day.... i trust it on the $60k + land rovers i work on!

David BJun 4, 2008, 9:20 pm · #13
KLOXwhen i was a car audio installer at circuit city... everyone had really expensive soldering guns... that they paid like $30.00 plus for... i went to a place called harbor freight and got one for 8 bucks!!! still works to this day.... i trust it on the $60k + land rovers i work on!


how many watts?
thats the main thing that matters
200sxkitcarJun 4, 2008, 9:32 pm · #14

I personally wouldn't go with anything less than a 60 or 80 watt one, and really, I'd rather get a name brand one.  I can spend $25 or 30, have it last most of my lifetime, be able to get replacement tips in various sizes easily, and know that it is a quality product.  They probably both came from China, but the name brand unit has more testing behind it than one that is from an unknown source that happens to pass UL testing in one instance.  I don't know, but maybe I was jaided from working in retail and dealing with shit off-branded products that were outsourced by importers from China and such.  But hey, if it works, ya know!

ryan206Jun 5, 2008, 7:51 am · #15

I have a 30w Radioshack one   Next time I'm at harbor freight, i'm gonna pick up another one cause my current soldering iron takes FOREVER to heat up

I don't solder too often..

This is a great writeup..

You might be the person to ask about heatshrinking. I've read a bunch of things online that you need a heat gun, while some say that a BIC lighter works perfect. How do you heatshrink stuff? I'm hesitant about getting a heat gun, mainly because I've heard they can burn your hands really easy and I've already had my hands burned from a soldering iron..

Jsvob03Jun 5, 2008, 8:22 am · #16
eminem_rh25You might be the person to ask about heatshrinking. I've read a bunch of things online that you need a heat gun, while some say that a BIC lighter works perfect. How do you heatshrink stuff? I'm hesitant about getting a heat gun, mainly because I've heard they can burn your hands really easy and I've already had my hands burned from a soldering iron..

You do not need a heat gun. if your iron is hot enough, you can use it, just run the iron real close to the wire, without touching it. viola! OR, a bic lighter works well, but becareful not to overdue it, cause you can burn the coating on the wires.

I recommend the rubber heat shrink. it has something like a 10:1 shrink ratio, and flexs better compared to the plastic/vinyl stuff. that stuff is only like 4:1. how can you tell the difference? plastic/vinyl is shiny, rubber is dull. (and you could look at the package too)
EternalSwapJun 13, 2008, 2:16 am · #17

I  personally use a $9 soldering iron I bought at AutoZone, its a 30W. Kicks so much ass.

Protip of the day: Pencil tips blow, get a legit chisel tip.

bluke1Jun 13, 2008, 5:49 pm · #18

as far as heat shrink goes, if you have a hair dryer laying around it works great without scorching it like you can with a lighter or the soldering iron. they also put out less heat and are cheaper than a heat gun.

alhickabeeApr 19, 2011, 6:00 pm · #19

I'd like to add that you should keep a sponge in your soldering kit.  Get it wet and use it to keep the tip clean before and after every solder.  You'll notice the iron heats up and melts the solder much more efficiently.  You should also pre-tin the tip with a bit of solder before using it.  Just melt some solder onto the tip then wipe it off on the sponge and repeat a couple of times till the tip is nice and shiny. 
Also if you're soldering a wire to something like an eyelet connector you want the connector to be hot as well so that the solder penetrates both the wire and the connector.  When the connector isn't heated up enough you can get a cold solder joint.  Also I be careful with an iron as hot as 80W, you might start melting the insulation on the wire before the connector is fully heated.
Personally I use a Weller WES51.  It's great for soldering just about anything wires to circuit boards because you can adjust the temp with the dial and you can interchange the tips.  It maybe $100 but after owning one for 2 years I hate soldering with anything else.
Also always use just enough solder to get a good penetration.  Too much solder can cause a spike in resistance.  Anytime you just getting big blobs of solder on the joint it's either not hot enough or you've got too much solder in there already.  And really you should use shrink wrap where ever possible.
Just my $.02 on soldering, something I do almost everyday.