Browse › Engines ›VG30E

prw-2 transitor swap

Started by Ju_S12_Turbo · Oct 14, 2012 · 38postsSMF 2010–26

Ju_S12_TurboOct 14, 2012, 2:31 am · #1

I highly recommend doing this swap, I just did it on my SE and it made everything feel nicer and pretty much everything the guy said on the z31 forum haha. I'll do a proper write up later in the week when I go back through and clean some wiring (Made it harder then I had to the first time hahaha)

http://www.z31performance.com/forum/viewtopic.php?f=24&t=34209

silvertonOct 14, 2012, 11:42 am · #2

The 87 is not set up exactly the same as the Z31 the write up is for, so this how-to confused me. Seeing how you did it will help since I have a spare PRW-2 and wouldn't mind doing this.

Ju_S12_TurboOct 14, 2012, 8:06 pm · #3
silverton on 11:42:54 AM / 14-Oct-12The 87 is not set up exactly the same as the Z31 the write up is for, so this how-to confused me. Seeing how you did it will help since I have a spare PRW-2 and wouldn't mind doing this.
I haven't done the How-to yet, I said I was going to do it later this week, Also I took the whole pathfinder harness (PRW-2 wiring plug and the coil wires and the resistor/diode) and cut to fit. I am going to do a cleaner version on my friends SE, because all the wires you need are already there minus the 3 prong plug haha.

 87 and 88 SE are the same power transistor, (wires going into it and coil wires coming off of it ) but yes the z31 ones are different but still the same concept. You have to look at some wiring diagrams but its all the same stuff.  I mean think of it like this, if we can use a 86 300zx ecu, then the wires must be going to the same place. 

Once you sit down and look at a pathfinder fsm and a 200sx fsm it makes way more sense. I think the D21 (Or whatever it is ) Hardbody even uses the same resistor/diode (They are all the same value, but the pathfinder combines both into one instead of 2 different units )set up as our cars .
I_heart_VVLOct 14, 2012, 11:27 pm · #4

Looking forward to a more detailed write up :thumbsup:

97jesterOct 19, 2012, 8:33 pm · #5

did it on my 88 se and idle smoothed out with better throttle response. mpg also went up a couple miles per gal

97jesterNov 6, 2012, 9:58 pm · #6

Have you done the write up on this yet? Was wondering which wires you hooked up to get the tach to work?

Ju_S12_TurboNov 7, 2012, 3:46 pm · #7
97jester on 09:58:09 PM / 06-Nov-12Have you done the write up on this yet? Was wondering which wires you hooked up to get the tach to work?
Not yet, been hella lazy haha. My set up might be a little different because I am running a MSD box with the Tach adapter
97jesterNov 8, 2012, 10:27 am · #8

Oh well that makes a big difference. How much better is your car with the msd? Was thinking bout putting one on my car.

Ju_S12_TurboNov 9, 2012, 1:23 am · #9

Maybe a little bit better low end with the coil and Box, But honestly I did it for the soft touch Rev limiter so I could lower my revs down to 6k, use to not make power past that point anyway haha. Now I got cams and headers so I need to rise my rev to 6800

calvins200sxFeb 25, 2013, 12:34 pm · #10

Here is a picture and schematic of the connector of the power transistor. This is from a 1991 Nissan pathfinder. This should help everyone out.
posted image

posted image

calvins200sxMar 5, 2013, 10:30 pm · #11

And here is the incredible way to get you stock tachometer to work after  installing the MSD 6A CDI Unit with this Transistor upgrade. I worked a couple of hours on how to get the tach to work. The good news is you don't need to purchase and adapters. So this will require you to keep the orginal high voltage coil. Now all that is required is to wire up the transistor, MSD 6A box, and the stock high voltage coil as follows. Now these wiring instructions are for My 1987 Nissan 200SX VG30E wiring. Yours might be a little different wiring colors. So anyhow here is what is needed,

Connect the wiring as follows,
1. Black wire from Body ground to Transistor Emitter
2. Blue wire from the 2.2K ohm resistor(ECU pin 3) to Blue wire of Transistor Collector and Ignition Coil
3. Blue wire from the ECU pin # 5 to white/black wire of Transistor Base
4. Black/white wire from Ignition Switch (12 VDC) to other terminal of the Ignition Coil. 

The trick here is that the Black /white wire carries the 12 volts that is added to the output of of the ECU pin 3 ultimately.  By adding the 12 volt to the signal from ECU pin 3 helps pull up the signal voltage which is required by the Tachometer. When I installed the MSD 6A I didn't connect the Black/White wire and thus the Tach didn't work. Of course MSD said you need to purchase the Tach Adapter at around 50 bucks. So I was determined to find a way to get the Tach working without buying the Adapter. Also I almost forgot to tell you you need to Silcone the High Voltage Coil output so you not grounding the Coil out. I'm going to buy a inductor (coil) tomorrow and see if that will work instead of the High Voltage Coil so I can get rid of the High Voltage coil all toghether. Also I'll try to draw up a schematic tomorrow and post it. Hope everyone can understand this and enjoy you Tach again.

Colonel GustardMar 8, 2013, 12:56 pm · #12

does anyone have any actual pictures of the wiring? installed in an s12? pleeeasseeeee, im dying trying to figure this out lol
Post Merge


Also, are the wire colors different on the pathfinder than it is on a maxima? i got my prw2 off an early 90's maxima and the wiring colors dont match up
WonderingravenMar 8, 2013, 1:27 pm · #13

This would be good to know, I keep forgetting to pick this up at the yard.

calvins200sxMar 8, 2013, 10:22 pm · #14

I realize the wiring is a different color from yours but if you compare your connector with the connector here it probably safe to assume that the wiring positions would be the same. Just compare yours to the one I have and you should be ok. You can always check you transistor with an ohmmeter to verify you have the correct wiring, ie base, collector and emitter.. There is a link on you tube that shows how to test the transistor.  You can look in the service manual for the correct color of wires. I'll try to take a picture of  my wiring tomorrow. Good Luck.


Colonel GustardMar 8, 2013, 10:32 pm · #15

A picture would be much appreciated. I lind of get the wiring but not enough to go out and do it. I'm still a bit confused bit I'm an electrical noob haha. Can't wait for the pics!

WonderingravenMar 9, 2013, 2:17 am · #16

Here is the updated link to the above. http://z31performance.com/showthread.php?18665-Upgrade-to-PRW-2-Ign-Control-Module-(Power-Transistor-Unit)

All you are moving is the green and black and black around. leave the blue alone. Should be common with others?

calvins200sxMar 9, 2013, 12:49 pm · #17

Here are some pictures of my install. I don't know if this is going to help you or not?

posted image
posted image
posted image

EternalSwapMar 16, 2013, 3:28 am · #18

gustavo wtf we had this shit!

WonderingravenApr 20, 2013, 6:13 pm · #19

Finally wired my up.

the PRW-2 upgrade is different from the z31 upgrade due to the wiring is much different.

First of all, when you are at the junk yard make sure you grab the wiring harness, just cut enough with the PRW-2 . I grabbed mine from an altima so my wiring is a bit different then the one with the Z31 wiring or the year it seems.

posted image
Here is where I cut both side of the harness off from the old prw.

posted image
I Hooked up the 2 blue and Green & Yellow wire together, white with the other green, and the black with black.
 on the old harness just hook up black and white straight threw as shown in this picture.

posted image

posted image

Final Product. I also jacked the mounting bracket to mount with the coil pack and it seems to work just fine.

Mr.510May 13, 2013, 6:50 pm · #20

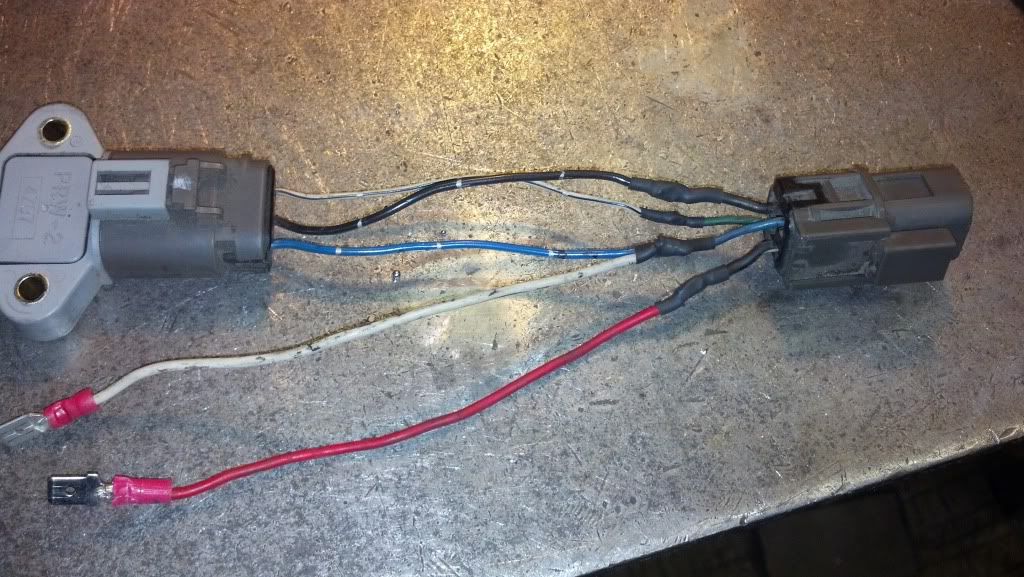
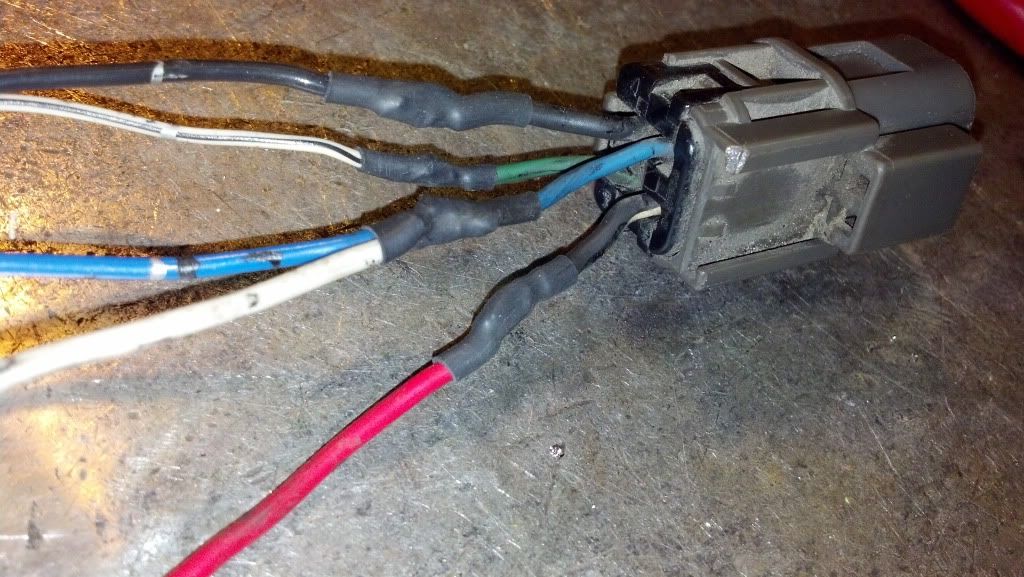
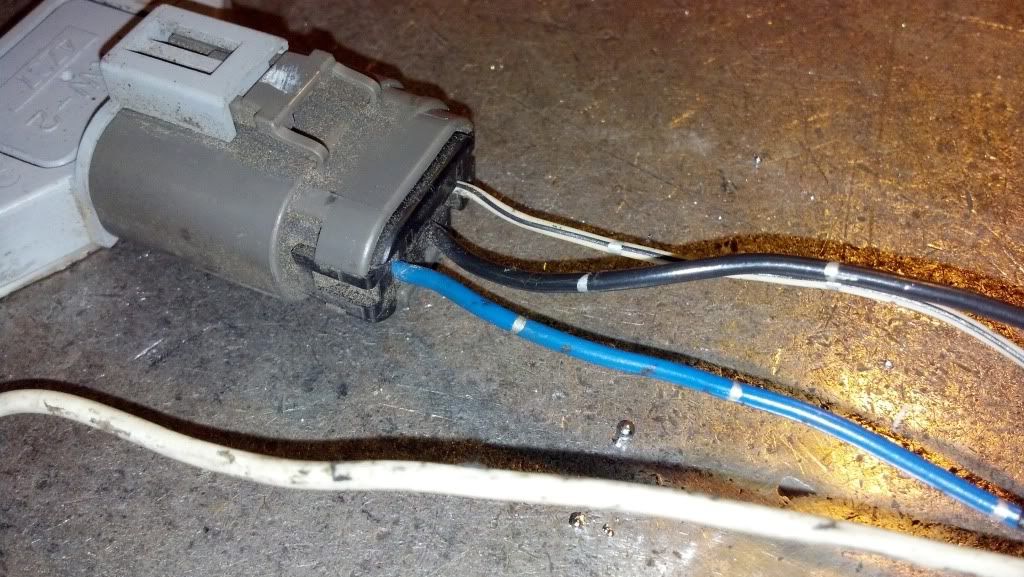
I upgraded my car to a PRW-2 ignition transistor from a Pathfinder yesterday. I took a few pics that I thought might make it a little bit easier to understand which wires connect to what. Keep in mind that the wire colors in your donor pigtails could be different depending on year/model and it's connecting the correct pins in the two plugs that matters, NOT connecting the same color wires! If both of your plugs have the same color wires in the same places as mine you can copy exactly what I did.

posted image

My car has an MSD-6AL and Blaster 2 coil. The red wire and white wire with spade connectors plug into the red and white wires coming out of the MSD. If your car doesn't have an MSD the red wire would instead attach to the black wire with white stripe and the white wire would connect to the blue wire in the two-wire plug that connected to the stock transistor.

I soldered my connections and used heat shrink tubing to protect them from corrosion. Here's a close up of the pigtail cut from the original transistor to clarify which wires go to what pins in the pic above:

posted image

I think it's obvious in the first pic where the wires go, but here's close up of the PRW-2 pigtail cut from the Pathfinder just in case:

posted image

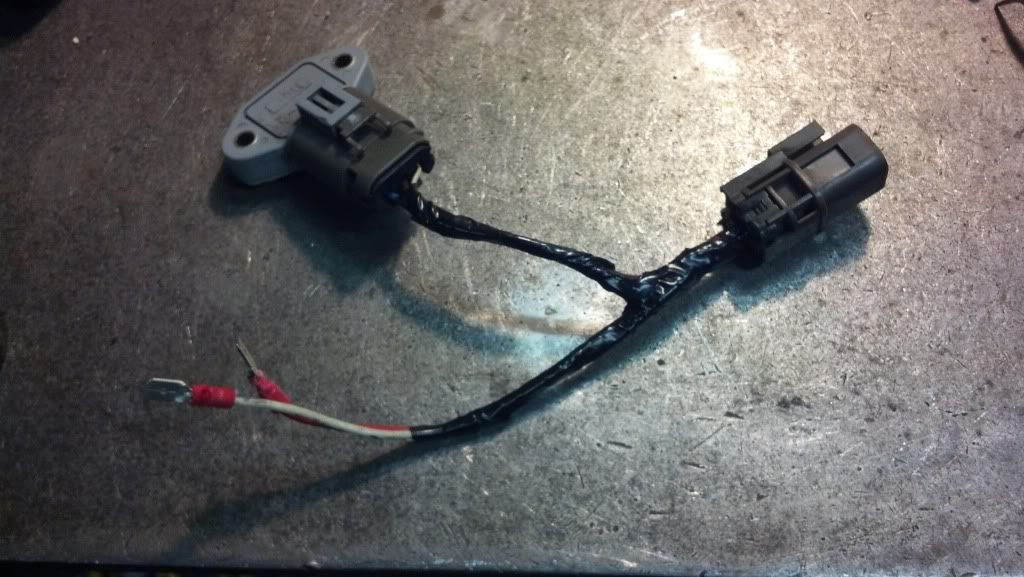
The completed adapter harness with transistor ready to plug into the car:

posted image

My car seems to run better and has a bit more 'crisp' throttle response. :thumbsup: This seems typical of what guys report on Z31P with this upgrade so I don't think it's entirely in my head.

Ju_S12_TurboMay 17, 2013, 3:37 pm · #21
Mr.510 on 06:50:27 PM / 13-May-13
I upgraded my car to a PRW-2 ignition transistor from a Pathfinder yesterday. I took a few pics that I thought might make it a little bit easier to understand which wires connect to what. Keep in mind that the wire colors in your donor pigtails could be different depending on year/model and it's connecting the correct pins in the two plugs that matters, NOT connecting the same color wires! If both of your plugs have the same color wires in the same places as mine you can copy exactly what I did.

posted image

My car has an MSD-6AL and Blaster 2 coil. The red wire and white wire with spade connectors plug into the red and white wires coming out of the MSD. If your car doesn't have an MSD the red wire would instead attach to the black wire with white stripe and the white wire would connect to the blue wire in the two-wire plug that connected to the stock transistor.

I soldered my connections and used heat shrink tubing to protect them from corrosion. Here's a close up of the pigtail cut from the original transistor to clarify which wires go to what pins in the pic above:

posted image

I think it's obvious in the first pic where the wires go, but here's close up of the PRW-2 pigtail cut from the Pathfinder just in case:

posted image

The completed adapter harness with transistor ready to plug into the car:

posted image

My car seems to run better and has a bit more 'crisp' throttle response. :thumbsup: This seems typical of what guys report on Z31P with this upgrade so I don't think it's entirely in my head.

haha, this is way easier then the way I did it. I love it!
night_s12Jul 4, 2013, 5:17 am · #22

How much is this part if bought new?

WonderingravenJul 4, 2013, 9:13 am · #23

I think last time I checked it was like around 80 on rock auto.

night_s12Jul 5, 2013, 7:52 pm · #24

Fuck that

WonderingravenJul 5, 2013, 8:46 pm · #25

Yes sir, that is why I get 2 for a very cheap price of $5 at pick a part.  I would pick more, but I don't need it.

night_s12Jul 5, 2013, 10:29 pm · #26

I cant do that here. All local yards liquidated all imports about 5 years ago

silvertonJul 18, 2013, 2:04 pm · #27
Wonderingraven on 08:46:43 PM / 05-Jul-13
Yes sir, that is why I get 2 for a very cheap price of $5 at pick a part.  I would pick more, but I don't need it.

You paid for something like this at a wrecking yard?  That's a pocket-able item yo!
WonderingravenJul 18, 2013, 2:57 pm · #28

Lol, I have to show some support to the ms13 guys who run it.

bluke1Dec 7, 2013, 8:17 pm · #29

I did mine a few days ago. I have a totally remanned "w" series motor with about 2k miles on it. Even with the fresh build, it still has always struggled  at idle from a cold start. This morning it was around 20* outside and it started and Idled perfectly. I have never seen it run this well. Highly recommended.
Post Merge


As a side note, this Must be stickled!
Mr Amber ShadesJan 11, 2014, 3:44 pm · #30

Just did it today.  I noticed idle is better and throttle response is improved.  Starting seemed better too. 

Real test will be cold morning start

Here it is before I soldered it and cleaned it up.  I wanted to test it before finalizing.
posted image

mcApr 28, 2014, 4:55 pm · #31

I finally got around do trying this upgrade...very nice results..here is another pix to add to help trace the wires.
posted image

Ju_S12_TurboMay 7, 2014, 5:05 am · #32

This thread should be cleaned up and Stickied, because this is a bad ass mod.

Mr.510Jul 1, 2014, 4:23 am · #33

A quick note I should have added to this thread a long time ago: You really should mount the PRW-2 transistor to something. Mine was not mounted but was captive between my MSD and inner fender, under the airbox. After a month or so the car started running weird but only when going slow in traffic or whatever after having just run it really hard. Turned out to be the transistor getting hot... and mine does not even carry the coil's load! It only triggers the MSD which directly powers the coil. I don't drill random holes in my rides so I just mounted a 'new' transistor to a piece of 1/16" thick aluminum about 2" square and stuck in the little cubby hole under the airbox. lol The piece of aluminum sheet is plenty of heat sink, even after sustained high RPM use the transistor is barely warm. I shitcanned the old transistor because heating electronics until they misbehave isn't the best thing for longevity. The car has pretty much run perfect since.   :thumbsup:

EternalSwapJul 2, 2014, 5:35 pm · #34

BTW, maximas have them mounted to a sweet little bracket that basically bolts into where the air box used to go.

And yes, I love my PRW-2!

Cajun1guySep 12, 2016, 8:55 am · #35

Finally got to do mine, it is definitely better. It used to buck a lot if I didn't downshift enough to its liking, now it is much smoother. Anyone know if the PRW-2 works for the CA18ET as well?

WonderingravenSep 12, 2016, 9:24 am · #36

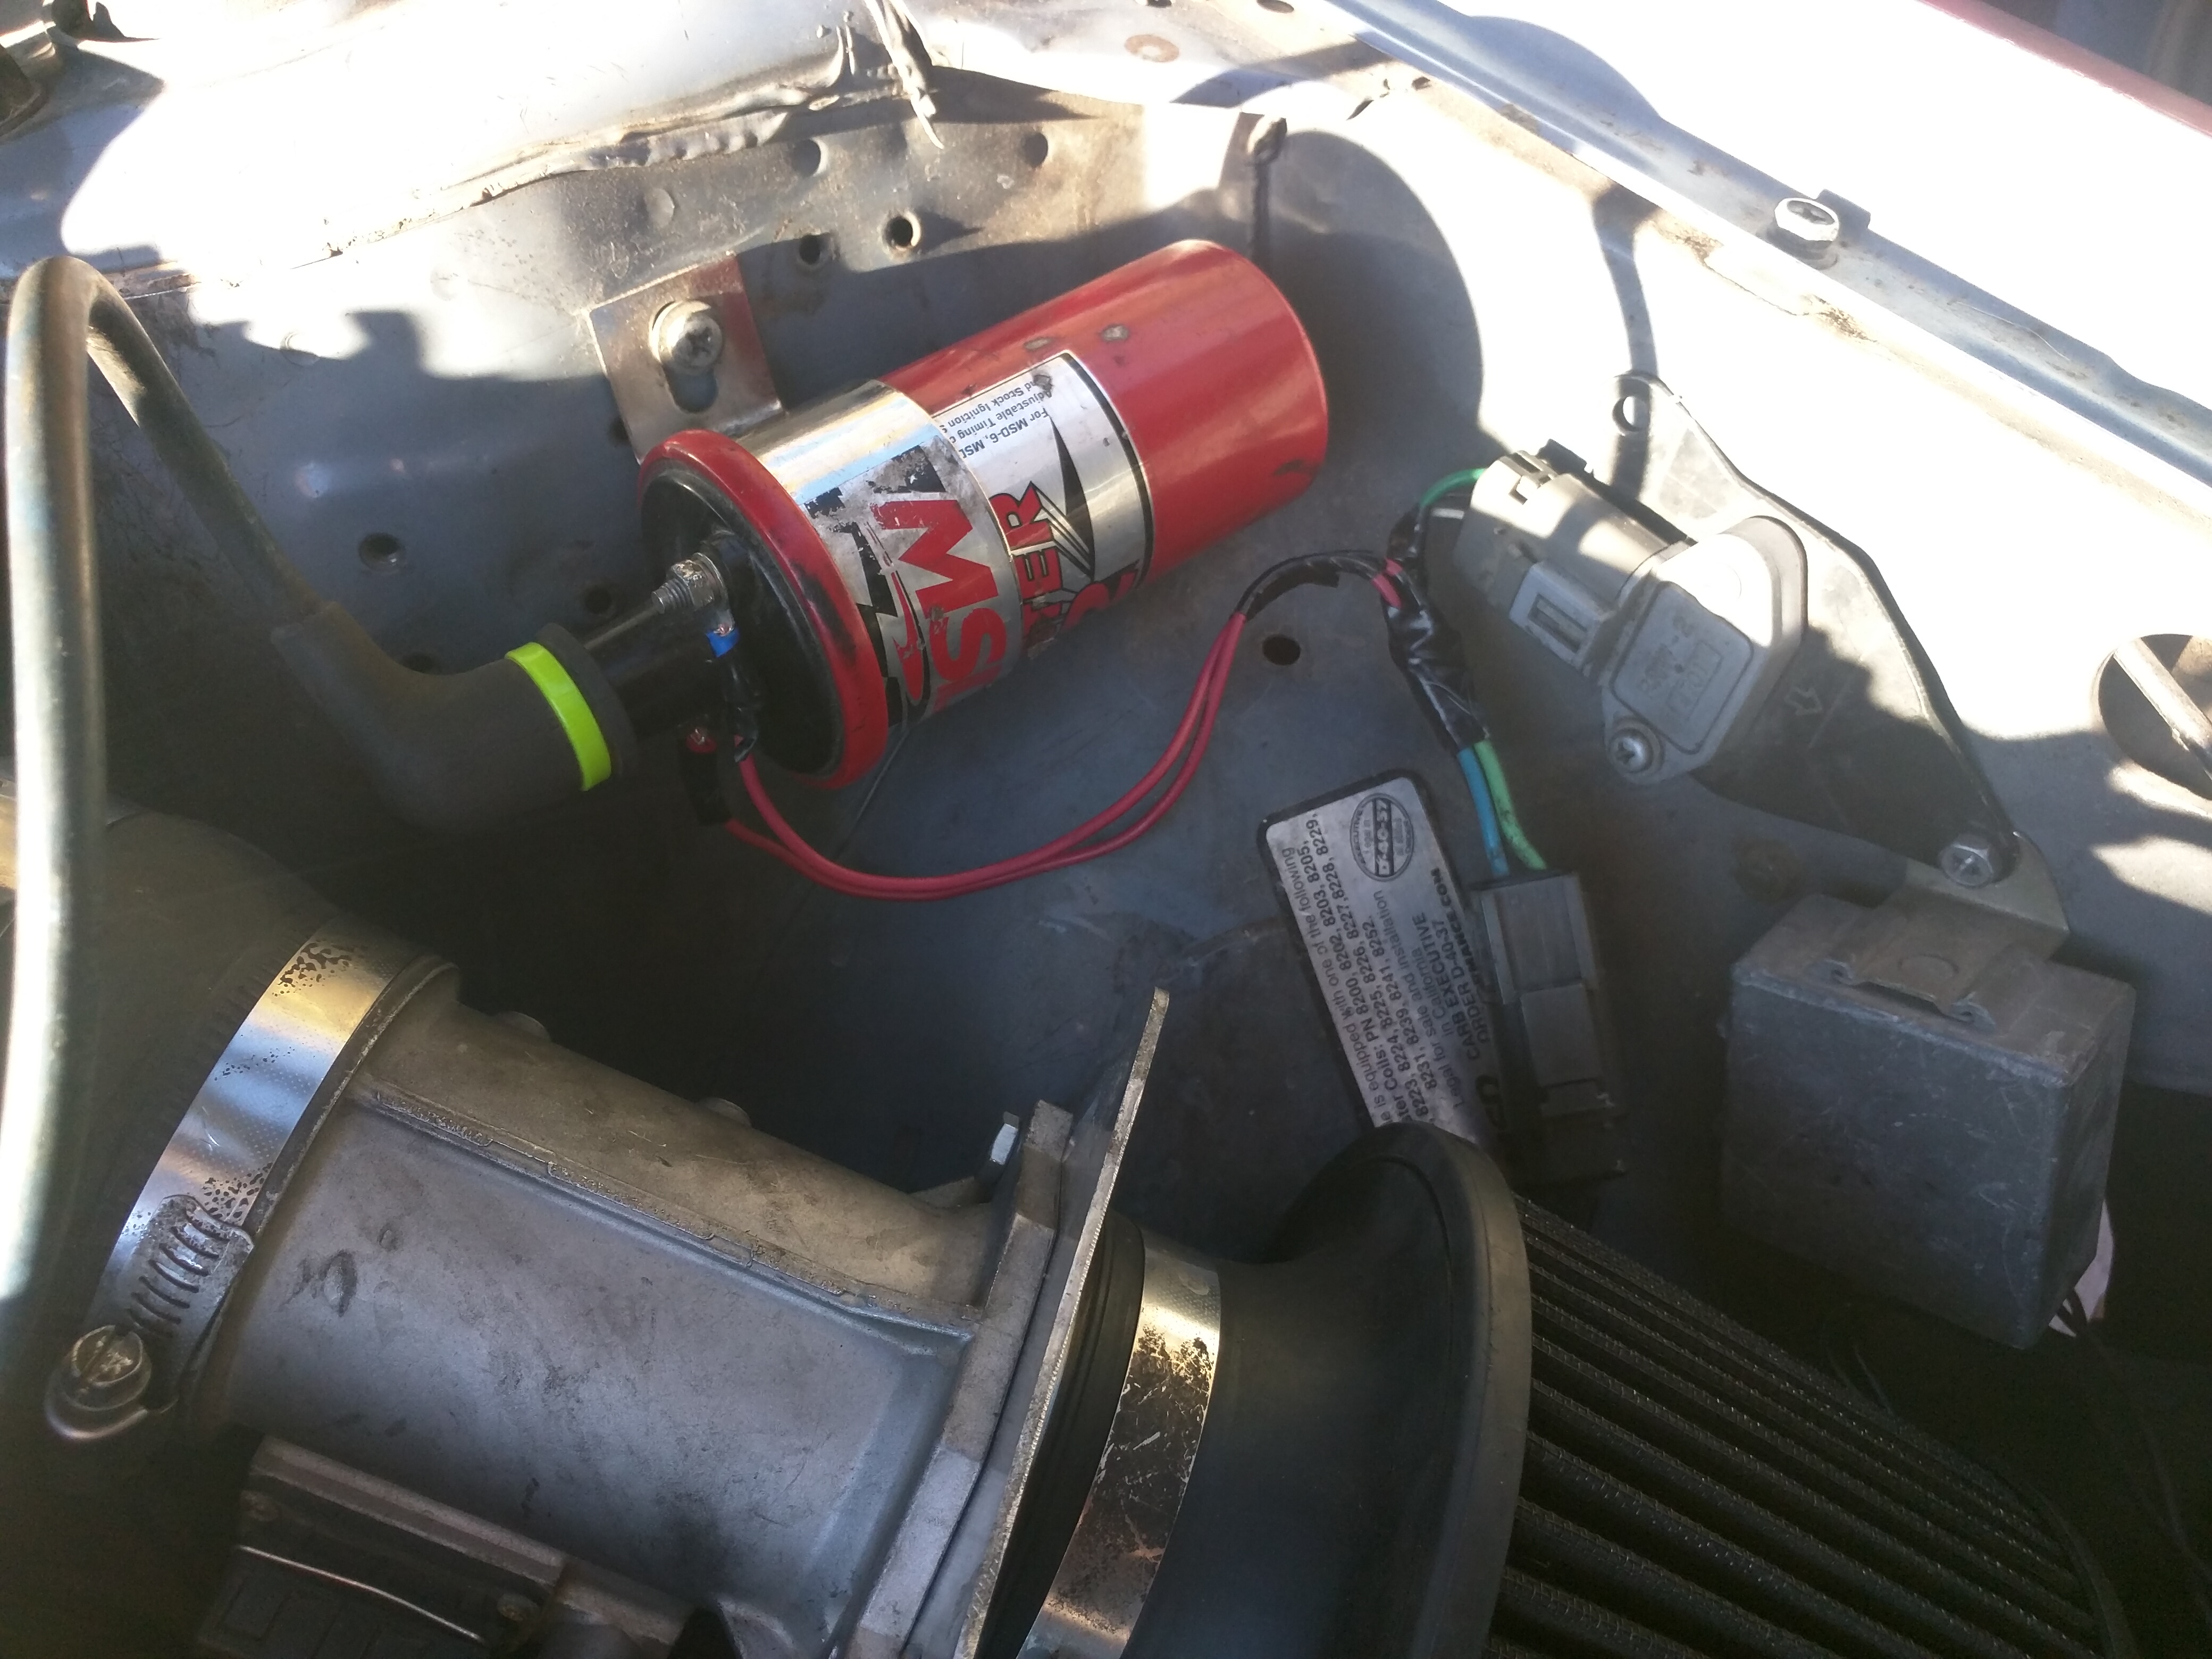
Redone my PRW-2 swap.
posted image

Cajun1guySep 12, 2016, 12:07 pm · #37

Wow, Old School on the coil! How is it working out?

WonderingravenSep 12, 2016, 3:53 pm · #38

quick fast and in a hurry, works great.