Browse › Tech ›Drivetrain

Bell Housing Swap Guide

Started by Philipn126 · Mar 12, 2007 · 13postsSMF 2010–26

Philipn126Mar 12, 2007, 7:44 pm · #1

to use your stock ca trans:  
     unbolt the bellhousing from the transmission  
     unbolt the front cover (inside the bellhousing)
     take off the snap ring (so you can pull the front cover off)
     then you can pull the two halves apart.  

do the same thing on the ka trans and then put the ka bellhousing on the ca trans.  dont forget to use a new front cover gasket (dealer only i think), reconnect all sensors, and fill that mofo up with the proper gear oil (GL-4).  you should use silicone/rtv where the the trans and bellhousing meet up.

from an old thread,

If you're ever separating either of these trannies, there are 3 bolts on the adapter plate that's sandwiched between the bellhousing and tail shaft. Don't take them out. These bolts align the shift rods. We didn't know that. As excited as we were that the bellhousings were the same when we reassembled the B tranny with the KA bellhousing, it refused to go into gear. Back apart the tranny came (it's a PITA, stupid circlips and f*cking 20 year old gaskets) and we took way too long having to readjust all the shift rods by feel.
200sxkitcarOct 24, 2008, 3:18 am · #2

another quote

Once you remove the front cover (inside the bell) the C clip that needs to be removed is around the bearing for the input shaft, its about 2.5"-3.0" in diameter. A pair of snap ring pliers really helps here, but its doable with a couple screwdrivers. Once thats off and all your main bolts are out you can stick a slim screwdriver in the seam of the two halves and pop it with a hammer a few times to begin the separation. Hope that helps.


theres some more involving the linkages,

basically, all you need to pull apart is the FRONT only, its not necessary to remove the back portion behind the steel separator plate.  There was a guy who accidently separated it all (removed the bellhousing AND rear case) and had trouble with the shift forks, but he might have taken out those extra few bolts.

You need to have a new gasket for the front cover there inside the bell housing.  Its the gray gasket, I JUST got one from Nissan, not too expensive and readily available still.

After its all put back together, test to make sure everything is a-ok by turning the input shaft in EVERY gear, and note if there are differences, turning in proper direction, etc. etc cause it would suck to have to pull it back down and tear it apart if something was off. just some suggestions...

(mod edit: original source of info http://www.club-s12.org/forums/index.php?s...=16940&hl=)
200sxkitcarOct 24, 2008, 4:13 am · #3

this is from the archives, second post in the KA section back in 2005

this guy did the reverse, as he used a KA trans to replace a damaged VG trans.

-> I pretty much did the same thing you are doing but in reverse. I used my stock vg bell, and the ka24 trans and tail shaft. I had to get a new driveline made 1 7/8 shorter $250 USD. It works very good. The tranny mount is my stock one no mods. It was a straight bolt up.  I had to cut the shifter hole back 2". As for a short shifter I'm using the C Speed shifter kit for the 240sx. It will work with the stock trans as well. If you have any Q's go ahead and ask me  

-> so its a vg or ka motor?

-> VG with KA Trans  


more stuff

ok, ive got it! there are 8 bolts that hold the housing and the tranny together. take those out. inside the bellhousing, there are 5 bolts that hold on the front cover. take those out. after you get the front cover off, there is a ring that needs to be taken off on the shaft. you will see it when get the cover off.
 then use a flathead screw driver to pry the front cover loose. (i put the screw driver through the hole in the bellhousing where the slave cylinder fork goes through.) the front plate slides off. then i took the screwdriver and pryed the housing and tranny apart while tapping it with a hammer. the adapter plate stays with the transmission.

then order a new front transmission gasket and oil seal when you put the front cover back on the bellhousing and use silicone when joining the bellhousing and transmission together.

total bolts to take out were 13... 8 connecting the trans to housing and 5 connecting the front plate to the bellhousing.
-phil again, the original KA resource  

setting up this thread to be the source of a Bellhousing Swap How-To  (gotta be important when in caps haha) but i need more pics.
200sxkitcarApr 29, 2010, 4:03 am · #4

If anyone knows of more detail in other threads or has pics that would be awesome, thanks!

SprockCapnMay 4, 2010, 8:29 pm · #5

Anyone have more info on this? I have all the Tranny>Bellhousing bolts off and the front cover off and both snap rings that are under the cover and the tranny wont pull apart more than about an inch.

whatbrake4May 4, 2010, 10:28 pm · #6

When swapping bell housing, do you have to get a KA flywheel/clutch or will the CA one work?  Might be a dumb question, but I cant find an answer.

SprockCapnMay 5, 2010, 12:08 am · #7

So my friend came over and pulled out some pins and now things are looking like this. I have a feeling it's not right though.
posted image

From the write up I got the impression that the gears stay with the back half, hopefully I'm wrong though since that's clearly not what we did. I'm confused cause the snap ring that I was supposed to remove didn't play any roll to what we did. Any help with this would be great. Thanks

EternalSwapMay 5, 2010, 3:08 am · #8
posted image
its supposed to seperate towards the front half of the plate you see there
SprockCapnMay 5, 2010, 7:58 am · #9
EternalSwap
Phisherman09Aug 19, 2010, 10:34 pm · #10

i searched for this today, and realized this swap guide kinda sucked lol.

so i took pics of how to do it:

performed on a s12 c series trans.
tools:
12mm wrench/socket.
stuff to pull transmission from vehicle (lol)
snap rings pliers (preferred) or screw drivers can work.
silicone
front cover gasket Nissan part # :32112-S13002 ( cost me like 6 bucks with tax from the dealer)

time: 20 minutes to 1 hour

step 1:
remove trans from vehicle, and from engine
posted image
(ca18et shown)

step 2:
remove clutch release bearing by prying up on spring to relase it from the clutch fork,

then remove clutch for dust cover, and clutch fork by prying it off the pivot ball
posted image

step 3:

remove 5 front cover bolts (12mm,there are 5 bolts)
posted image

step 4
gently pry away front cover with hammer/screwdriver. i stuck a screwdriver in the clutch fork hole
posted image

step 5

remove snap rings holding input shaft bearing on. snap ring pliers are the preffered method. but you can also spread them with screwdrivers.

kinda hard to see in the pic, but youll see it when you get in there.
posted image

removed snap ring
posted image

(note: my s12 trans only had 1 large snap ring around the bearing itself. the sr20 s13 trans also had a smaller snap ring in front of the bearing. the s12 input shaft appears to have not have the slot for the 2nd snap ring.)

i looked in another s12 trans and it had the 2nd snap ring. so not really sure on that one LOL

step 6:

remove the (8) 12mm bolts holding the trans case to bellhousing.

posted image

step 7: lightly tap/wiggle bellhousing free from the shaft.

and youll be left with this

posted image

re-installation is reverse of removal.

be sure to silicone the bellhousing to trans case surface, and use a new gasket on the front cover.

datzenmikeAug 22, 2010, 7:37 pm · #11

Here's some more info:

http://www.club-s12.org/forums/index.php?a...t=0#entry257306

http://club-s12.org/v3/index.php?topic=27501

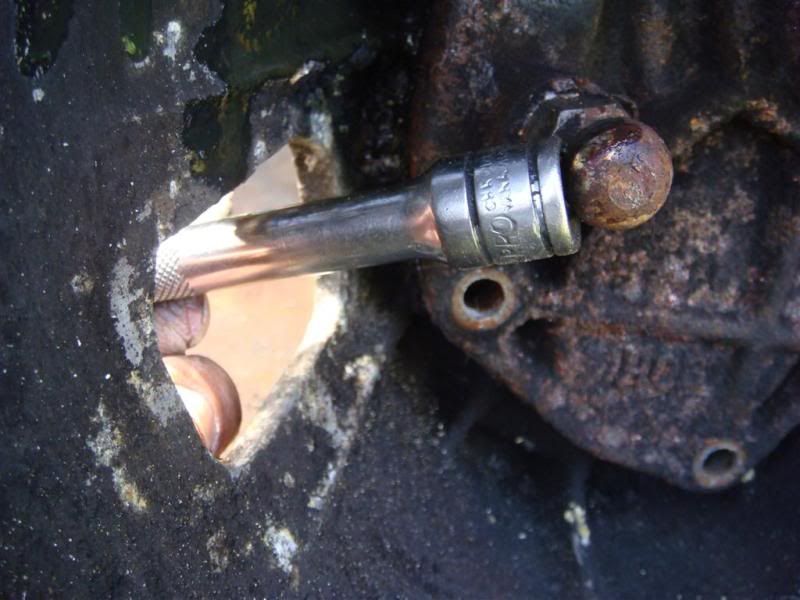
Also here's the proper way to loosen the front cover without using a screwdriver to split it apart:

posted image

Tap on the pivot ball so the gasket surfaces won't be scratched.

8SixS12Oct 3, 2012, 7:33 pm · #12

I just did this and remembered an easier way to separate the two halves.  If you back out all the 12mm bolts holding the halves together, with only about 1/4 of the threads remaining the tops will stick out allowing you to hit them with a brass punch (or a socket extension will work too).  Doing it this way will avoid prying which could damage the mating surfaces.  I remembered seeing this in project car mag awhile back.  I would have started another thread but, this info belongs together.

8SixS12Nov 1, 2012, 8:50 am · #13

One more important thing to add... There is also a shim in front of the countershaft bearing that must be put back into place. Another thing is that if you find that the tailshaft housing has separated from the adapter plate you have to re seal it. DO NOT forget to put all the shift forks into neutral and insert the shift control rod in the slot between them before putting the cover back on. Had to throw that in. If anyone needs an explanation or help I will be glad to elaborate.